 Outdoors - but still dry and stable: The terrace is our “living room in the garden”. You can have a wonderful meal together, relax and simply enjoy being outside.
The terrace floor has an important function: It provides a solid base for comfortable garden furniture and insulates against cold and wet. Building a terrace is a challenge for many homeowners. If you're not sure yet whether you can do it yourself - read on: You will learn how to create a terrace yourself in simple steps here.
Wood, stone, WPC or concrete: What material do you use to build a terrace?
If you want to build a terrace, the first step is to choose the material. Basically you have the choice between wood, stone and WPC.
Wooden terrace: Advantages and disadvantages
Wooden floorboards exude a particularly cosy and warm flair. They also offer the advantage that they do not heat up excessively in strong sunlight. That means you can walk on them barefoot even in summer. However, a wooden terrace needs a lot of maintenance and some types of wood tend to splinter. Compared to other materials, they also have a lower durability and are easily discoloured due to the weather.
Tropical woods such as Bangkirai or teak are very robust, but from an ecological point of view they are questionable because they come from the rainforest. You should at least pay attention here to the FSC seal for sustainable forestry. Local wood species like oak or robinia are more environmentally friendly. Using certain methods (soaking in wax or thermal treatment), regional woods can be made more resistant.
 WPC terrace: Advantages and disadvantages
 WPC terrace: Advantages and disadvantages
The material WPC is a mixture of wood and plastic (the abbreviation “WPC” stands for “Wood Plastic Composite”). WPC terraces are becoming increasingly popular because they are very durable, easy to care for and splinter-free. In contrast to wooden boards, WPC boards are much less sensitive to weather. However, slight discolouration is also to be expected here and WPC heats up more when exposed to sunlight. WPC planks are available in numerous colours, but you have to do without the typical wood pattern.
Stone terrace: Advantages and disadvantages
Stone is the most robust of all terrace coverings: This material is dimensionally stable, defies all weather conditions and is durable for decades. The disadvantage, however, is that stone terraces get very hot in the sun so you can't walk on them with bare feet. Tip: Choose lightcoloured stones ad they don’t heat up as much. Stone is less cosy than wood or WPC, but the material is very easy to care for. If you want a stone terrace, you can choose between many different types, patterns and designs. From paving stones to fine stoneware to natural stone or concrete stone - stone terraces are very diverse!
The most important step: Planning the terrace
Before you start building the terrace, you should plan it very carefully. Meticulous planning makes you work faster and you avoid annoying mistakes. Make a sketch!
You should think about the following:
- the shape, location and area of the terrace: Determine the exact area of the terrace and measure it exactly. Then make a scale drawing using a pencil and ruler (or digitally).
- Material: Decide whether your terrace will be made of wood, stone or WPC.
- Covering type: Different patterns are available depending on the material. For example, stone slabs can be laid in a row or cross structure. The laying pattern also depends on the size and shape of the terrace. If the wooden planks are shorter than the terrace, several must be put together.
- Structure and depth: Determine which layers are necessary for your terrace and what the exact structure should look like. You can then calculate how deep you have to dig the soil.
- Material and tool requirements: Building on the points above, calculate how much material you need for each type. Finally, create a list of the tools you need.

How much time should you plan to lay out the terrace?
Don't underestimate how many steps are involved in building a terrace! A team of 2-4 experienced craftsmen can do it in one day. But if you're building a terrace for the first time, you should plan more time. If you are working alone, you have to estimate at least three working days. The exact time of course also depends on the type and size of the terrace. It is best to ask 1-2 friends or relatives for help so the work will go quicker.
The following steps need to be planned:
- Measure area, create sketch and material list
- Lift up the floor 15 to 20 centimetres
- Fill and compact the trench with several layers of crushed stone
- Distribute split
- For wooden terraces: Erect substructure
- Lay stone slabs or planks and cut to size if necessary
- For stone slabs: grout
You need these tools
Have all the tools you need ready before starting work. Tools that you don’t have yourself can be borrowed from friends or rented from the hardware store.

- Shovel
- Spade
- Wheelbarrow
- Plumb line
- Barrier tape holder
- Spirit level
- Mason's angle
- Ruler
- Rubber hammer
- Trowel
- Rammer or vibrating plate
- Straightedge
- Devices for cutting stone slabs or wooden planks
- Possibly: Cordless screwdriver
- Possibly: Panel lifters, joint crosses, isopads, spacers
Depending on your patio project, you may need additional tools: for example a trolley for the stone slabs, a broom for sweeping the joints, etc.
Build your own terrace: Instructions
The planning is complete, the tools and materials are ready: Now it's time to get to work! Depending on whether you want to build a terrace from wood, stone or WPC, the process is a little different. Attention: Most terraces require a slope (approx. 2%) so that the rainwater can run off.
Build a wooden terrace yourself - how to do it
- String a cord across the surface: Hammer in the barrier tape at the corners of the terrace area and attach the guide line to it. Make right angles with mason's angle.
- Digging out the soil: Measure from the planned top edge of the terrace to the ground. Add up all the necessary layers of the terrace. Using these two values you can calculate how many centimetres of soil you have to dig out.
- Fill the pit with around 20 centimetres of frost protection (e.g. gravel): Apply the ballast in layers and compact it again and again with the vibrating plate.
- Tension lines lengthways according to the gradient: Place lines on the wall of the house at the level of the planned upper edge of the terrace. Then set the end of the line a little lower (with a 2% gradient, i.e. 2 centimetres per meter).
- Then spread about 4 centimetres of gravel on the surface: Level off with a levelling stick so that there are no voids.
- Place weed fleece over the gravel.
- Lay a few terrace slabs as the foundation: The entire area does not have to be covered with slabs. The terrace slabs should each lie under the beams of the substructure. Alternatively, you can use special foundation stones instead of terrace slabs.
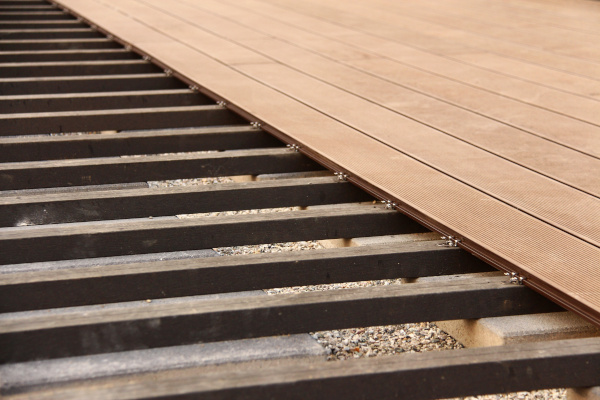
- Building the substructure: Cut the beams for the substructure and fasten them to the foundation stones with the cordless screwdriver. Leave a 1.5 cm expansion gap between the adjacent beams. To do this, temporarily clamp isopads between them.
- Fasten the wooden planks to the substructure: To do this, place spacers on the substructure, then attach the wooden planks to them using the cordless screwdriver. There must be 1.5 centimetres of space between the planks and the house wall. Let the boards protrude from the front of the terrace. Finally, shorten all the boards simultaneously with the circular saw. First place a guide rail so that the edge is exactly straight.
- Create the border with other wooden planks. Leave a distance of at least 2 centimetres from the floor.
- Apply a protective coat of paint to the open cut edges of the wooden planks.
Build a stone terrace yourself - how to do it
- String a line across the surface: Measure the exact area of the terrace and enclose it with the masonry line. Create right angles with the mason’s angle.
- Digging out the soil: First count all the layers of the terrace. Then measure from the planned top edge to the floor. You have to dig out the difference.
- Distribute gravel: Distribute about 20 centimetres of anti-freeze material, such as gravel. Apply in several layers and compact well in between with the vibrating plate.
- Align longitudinal lines according to the slope: Attach the line to the house wall at the final height of the terrace. Attach the other end a little further down to create a gradient (approx. 2 centimetres per meter for a 2% gradient).
- Lay border stones: To do this, place the border stones in mortar and exactly along the line.
- Adjust the height of the ballast: The distance between the ballast and the top edge of the border stones must be the same everywhere.
- Apply grit: Spread around 4 centimetres of grit and level off with the levelling stick.
- Lay terrace slabs: Place the slabs in the grit bed using the plate lifter. Maintain the desired distance from the curbs or between the slabs using isopads and crosspieces. Insert all slabs according to the installation diagram. If necessary, cut slabs.
- Remove tile spacers and isopads.
- Spread the joint grit on the slabs and sweep in with a broom.
Creating a terrace: The most important points at a glance
Creating a terrace is not that easy. But with a little craftsmanship and good planning, laypeople should also be able to do it. Here is the checklist for everything you absolutely have to consider:
- The terrace needs a gradient of about 2% so that the water can drain off.
- The stable surface made of compacted gravel (which also acts as an anti-freeze material)
- Grit layer on top so that water seeps away faster
- Precise planning in advance: exact area, material, how many panels or planks, which substructure, which laying pattern etc.
- Don’t underestimate working hours
- Protect the house wall with bubble wrap: To do this, place the bubble wrap on the house wall and weigh it down with gravel.
- Keep a distance between the boards as well as the boards and wall (at least 7 millimetres), because wood and plastic expand.
- Treat wood afterwards
Finally: Make your terrace pretty
Before you can sink into a soft garden armchair, you have to make your terrace cosy. For a convivial get-together at a grill party and the like, you should set up a weatherproof dining table with chairs. Dinner together Nothing stands in your way outdoors! If you like things more cosy, invest in a cosy outdoor lounge made of upholstered furniture. Some decorative plants, such as olive or lemon trees in planters, complete the look. Now there is only one thing left to do: take a seat and enjoy!
Images:
© Ozgur Coskun – stock.adobe.com
© WoGi – stock.adobe.com
© Marina Lohrbach – stock.adobe.com
© Dariusz Jarzabek – stock.adobe.com